Getting Growing

Uncategorized

After all the heavy lifting of last years backyard renovation, one of the things I was excited about was having a little area to grow some fruits and vegetables.  

We spent a little time last weekend thinking through how much space we have and what we want to plant, and came up with a list. We tried to figure out the items that we actually use on a regular basis and decided on the list below:

  • Poblano peppers
  • Shishito peppers
  • Bell peppers
  • Onions
  • Garlic
  • Tomato
  • Beets

We went to the nursery and picked up some seed packets and then I set out to research. The first thing I realized is that we needed a schedule to remember when we need to start seeds, plant them in the ground and when they’ll be available to harvest. I came up with this:

  
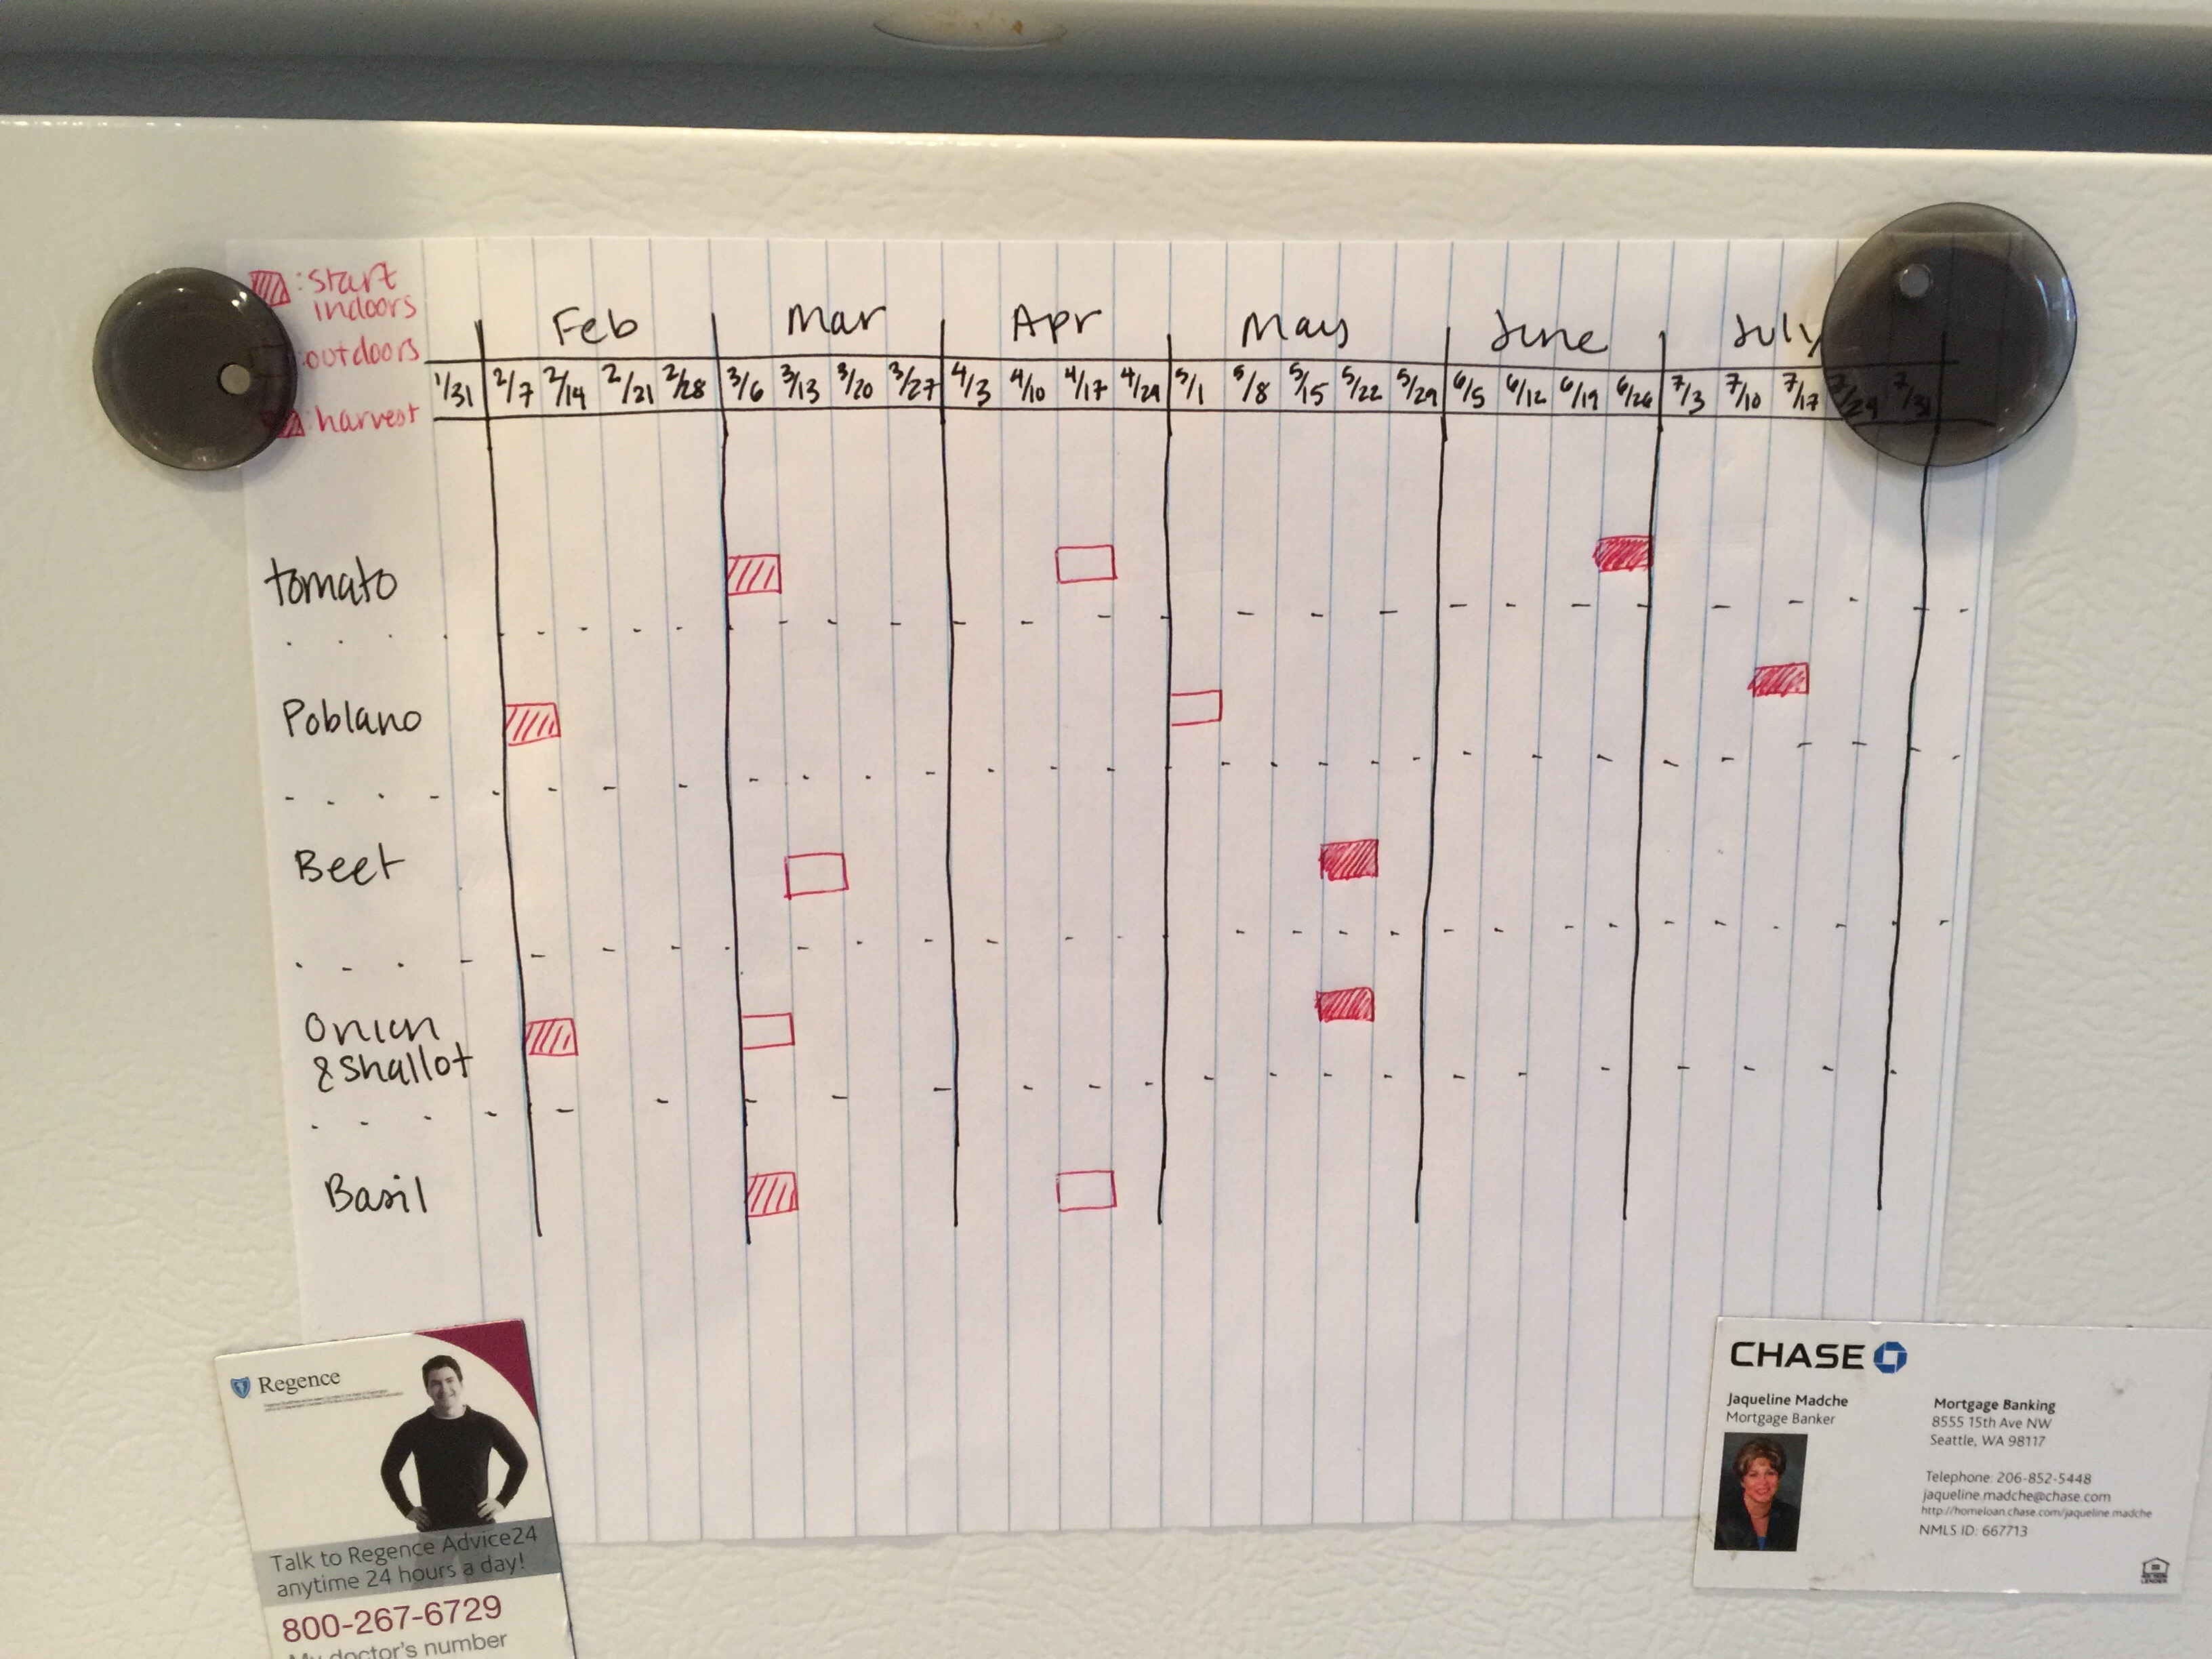
Garlic, Bell and Shishito pepper seeds weren’t available yet, so I’ll add those later. I saved some seeds from a store-bought poblano pepper, so I used 3/4 store bought and 1/4 salvaged seeds for that.

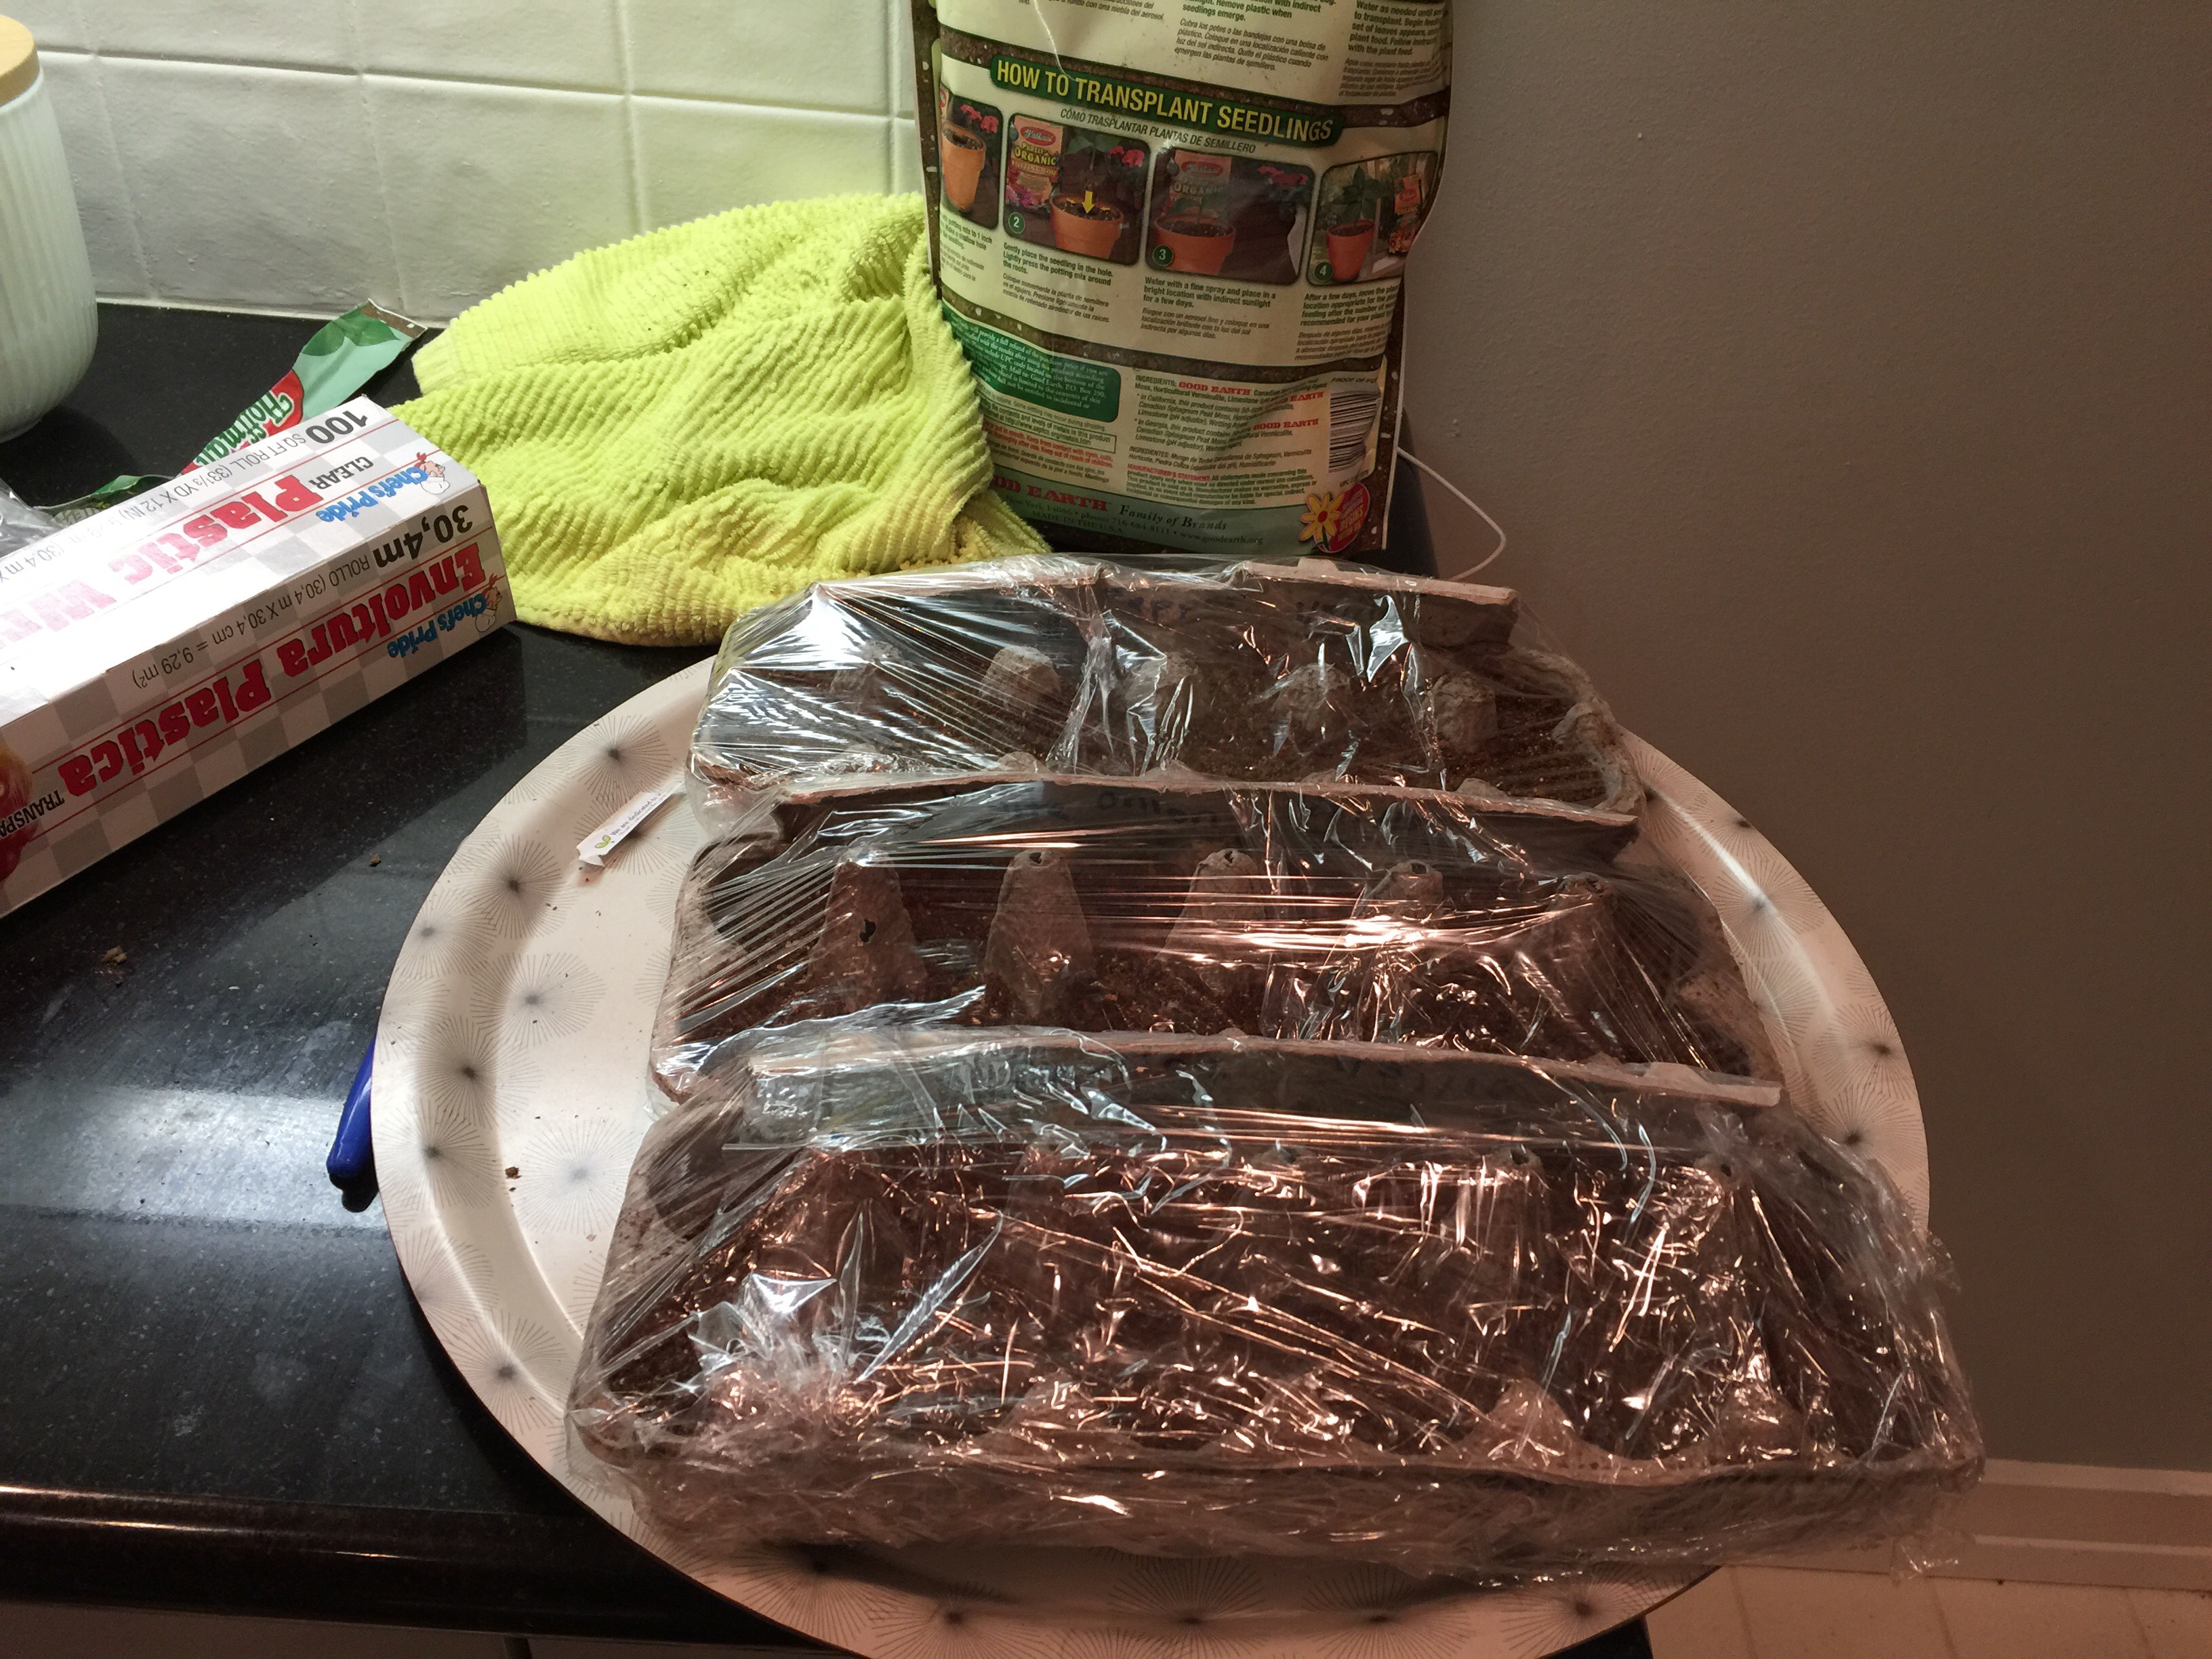
Since we’re trying to do this on the cheap, instead of buying seed starter kits, we opted for egg cartons. The Internet says they work just fine, so we’ll see!  Basically, you just fill them up with seed starter mix, drop in the seeds and put more mix on top. 

  
Then you water “thoroughly” (and keep them watered), wrap in Saran Wrap and place somewhere warm for the seeds to germinate. Apparently they don’t need light at this stage, so we put them by a vent in the basement. 

  
Once they germinate (5-15 days) you move them somewhere with plenty of light so they can start to grow.

I’ve never done anything like this before, so we’ll see how it goes!

New life to an old dresser

Uncategorized

We have an old wood dresser that I remember having in my house growing up. It never worked well – drawers getting stuck, the back would fall off, etc… For a minute we thought about selling it as-is on Craigslist, but Alex has been wanting to give it a makeover for a while, so we figured we’d put a little work into it and maybe make a little bit off of it. 

 It started out looking like this: 

I had changed the knobs a few years ago, but other than that it was exactly the same for the last 20+ years.

 Here it is with the drawers pulled out of it:  

(And a shot of Eve, the new puppy with her cone of shame after getting spayed last week)


Alex decided that this would be a good wine rack or console.
   

We broke down the bottom two drawers and used the pieces from the drawers to create shelves.
 

 Then sanded it down:  

Alex added parts of the door fronts as lips for the front of the shelves. This added a bit of detail, and is also the perfect little lip to rest the front of a wine bottle.

Then we primed:


Stained and sealed the top and painted it, so now it looks like this:

  
Wine bottles fit perfectly and I think it looks a million times better! Now we get to give it a new home by selling it on Craigslist 🙂

A bed fit for a king

Building, Dogs

Last year, Alex and I made matching, scaled in size dog beds for Porter and Bogey.

This was all part of Alex’s master plan to keep Bogey from sleeping on the bed, and I have to say it worked really well.

Bogey had never really liked any of the dog beds if bought for him, but something about this one just worked!

Looking anxious to get off the bed


After seeing the dog beds a friend of mine, Alaina, asked me to make one for her.  I decided I would make it as a pre-first-baby present for Alaina and Ruluo, the pup. It was a relatively straightforward build out of 3/4 plywood, using 1x2s as trim.

Similar to our build, we painted the bed white and used chalkboard paint where we could write Rulo’s name.


It looks like he liked the final product!!


Backyard final budget breakdown

Uncategorized

I know… super exciting… except it kinda is to me :). When we first started this project, I got several bids for various versions of this work.  The lowest bid I got was ~$8K for just the demo & hauling, and a minimum of ~$40K for the full project.  My goal was to keep the entire project less than $13K.  The final tally is in and… we did it!  The total rolled in at $11,817.

If you’re curious about the breakdown (I’m sure you are) here are the details:

Backyard Final Budget

Of course… it’s never actually finished.  Just last weekend we bought some more plants, but I’m calling this project finished – and a success for now!

-H

Garden Plan

Backyard, Exterior, Garden

I figured I should at least try to remember all the various things we planted since I’m sure some may not make an appearance next year.  I went through and inventoried all of the various plant tags and tried to indicate where we planted them.  My memory is a little fuzzy on a couple of them, but hopefully I captured most everything.

IMG_1738

Garden Plan 2

There are still quite a few plants that we planted but aren’t pictured.  Those are:

  • Japanese Blueberry Tree (Shogun series)
  • Nugget hops
  • Hydrangea Endless summer (Bailmer)
  • Rhus typina Tiger eyes sumac (Bailtiger)
  • Shasta daisy
  • Calla Lilly
  • Cinese Lantern Physalis
  • Phoenix Red penstemon
  • Salvia greggii

Hopefully everything makes it through this winter!  I’ll try to capture the same image again next year.

-H

1845…and 1/2

Backyard, Dogs, Exterior

I originally wrote this post on what turned out to be a very sad day.  Our Corgi, Porter, passed away very unexpectedly.  He didn’t get nearly enough time to enjoy his house and he is missed very much.  We hope that Bogey, our Yorkipoo will still use the house and we will think of Porter every time we see it.

Porter, the Corgi, loves to spend time outside – no matter the weather.  While the new backyard is great for that, it also means that he hangs out in the rain and mud and then comes inside bringing all that with him.  In order to keep him happy outside… and keep our inside as dry and mud-free as possible, we decided to make him a dog house.  We used leftover materials from the deck and fence projects so the only things we needed to get were roofing shingles (I remembered later that we threw some away during the garage demo… oh well) and flashing.  Other than that, it was a free-to-us project!

12027680_10153150425809033_3750534300424001757_n

Trex base and 4×4 framing

12046685_10153150425849033_1792768462066699062_n

Framing complete!

12002969_10153150425844033_8452469607276566279_n

Cedar plank siding and front porch

12038523_10153150425814033_3386438991480055186_n

Finished house!

12038421_10153150425889033_8190541688980222939_n

Porter checking out his new place

12042872_10153150425899033_8825356052311638060_n

Current spot for the dog house. It weighs a TON, so Alex and I couldn’t move it to the spot where it will ultimately go, but it works here for now!  We need some strong friends to come over to help us move it in to place 🙂

-H

Ta-Done!

Backyard, Exterior, Garden

Well…we’re done!! It’s been a couple of weeks since the last post, but it’s because we took some time to actually enjoy all of our hard work 🙂

After the rainstorm & flooded basement debacle, we spent the next couple of days finishing up the deck skirting and planting. Then called it finished for the year. This means that we didn’t finish everything we thought we would (cable rail for the deck, concrete patio, etc…) but we got most everything done:

  • Demolish existing deck and garage
  • Re-build deck and add new stairs and railing (have a wood rail in place but wanted to do a cable rail – this may have to wait until next year)
  • Build new fence and gate
  • Break out concrete, add drainage (just in case), build retaining wall, fill with dirt and plant garden and raised beds
  • Add irrigation and lighting
  • Repair and stain concrete patio (this will have to be next year)

To remind you, this is where we started:

And 6 weeks later, we had this:  


It was a long, hot summer, but we have such a great space to enjoy the (hopefully) few weeks of nice weather this year!

So backyard is done…for now 🙂

-H

Two steps forward, one step back

Backyard, Exterior, Garden

We arrived home Friday afternoon during the first major rainstorm this summer to 4″ of water in the basement. It was pouring in through the electrical conduit pipe that we had cut off during the garage demo. It was run out there to provide electrical for the garage. It ended up getting buried basically under the retaining wall and when water built up after the rain, it started running through the conduit – directly into the basement! 


that little thing in the back is the garden-end of the conduit…under the retaining wall!

 
It was so frustrating to have done all this a hard work and have to deal with this issue. Luckily we figured out right away what the source was and got to work trying to stop it. Poor Alex was out there in the pouring rain digging and trying to rig something up to stop the water flow.


The poor guy also got shocked by the electrical extension cord we were using out there as well! 

We were able to use the shop-vac to drain the water so it would stop pouring in and brainstormed over dinner with my dad.  We still didn’t have any great ideas when we went to bed cold, exhausted and discouraged on Friday night.

Saturday morning my dad came back with some plugs and roofing sealant – so we plugged up both sides of the conduit and covered the exterior end with concrete. 

Fingers crossed our solution prevents this from happening again! 

-h

One step closer

Uncategorized

We spent last weekend putting some of the finishing touches on the backyard. We needed to put deck skirting on to cover up the structure underneath. I attempted this solo at first and really hated it (so much that apparently I didn’t take any pictures!) so Alex and I rented a nail gun and got to work putting the boards up.

  
By the end of the weekend, the deck looked almost finished!

  
There’s still more to do to get it finished up, but getting closer!

-h

A sod story

Uncategorized

With a nod to those of us that are grass rollers by nature, I get to write the Sod post. Porter and I (Alex), unfortunately, have to wait until we can embrace our innate disposition, because you are not allowed to play on new grass for 2-3 weeks!! The sod needs to get rooted, so even before we began laying it, we had to flatten the ground (or at least make sure we didn’t have any unintended divots), put in edging, sprinkle fertilizer, and install a sprinkler system. All of this took the majority of Saturday morning! Its really surprising, and somewhat disappointing, but when it comes to a lawn or garden, most of the work is hidden under the ground where nobody will ever see it or think to compliment you.

Anyway, after we got all the non-visible prep work done we started laying our sod on Saturday afternoon. As a side story, my jeep, which isn’t a work truck, is officially a work jeep–covered in dirt and plant debris from our multiple visits to the Home Depot gardening section and flower world. Our first trip to Home Depot resulted in 20 pieces of sod, which wasn’t enough. When Saturday evening came around, we were short on Sod, so we made a second trip to Lowes on Sunday. This time, however, the jeep was also filled to the brim with various plants, flowers, and shrubs.

After a long weekend, however, we now have grass, sprinklers, and the start of a serious garden. We still need to fill our green planter bed. I say green, because thanks to Hannah’s amazing eye we were able to use a recycled chunk from the old deck. We just flipped it over and now it is a perfectly aged green planter box. Hannah also had the great idea of using some of the old concrete as a step in the garden between the grass and the planter box. Incorporating the old with the new is really neat.

Hopefully in a couple weeks we will all be rolling in the grass!